My Marvel Snap MODOK deck
I've been playing Marvel Snap quite a bit since it came out, and I'm currently using a deck based on MODOK that I'm quite happy with.
This is what that deck currently looks like:
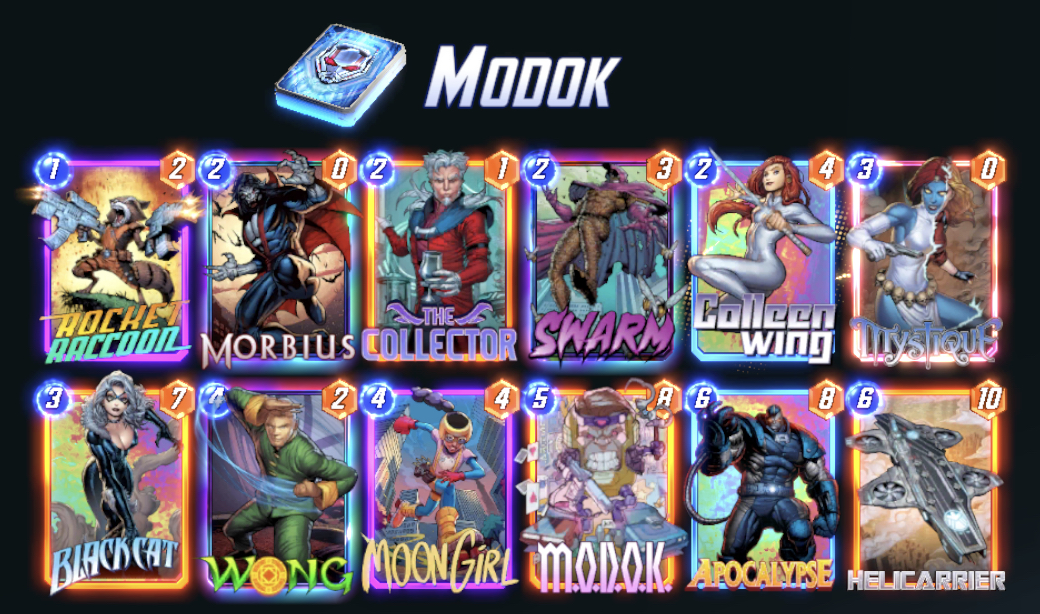
It's built to have multiple ways to deliver a ton of power in rounds 5 and 6.
It's not built to react to an opponent. I have a reactive deck, and it's fun, but I tend to lose because I can't generate enough power with it.
I don't win every single game with this and it has its vulnerabilities, but it works well, and I've never quite seen anyone use MODOK this way against me.
Here is a detailed explanation.
The concept
The concept of this deck is to play MODOK on round 5, and to generate points through Morbius, Mystique, and The Collector, and/or to build up Apocalypse and Swarm, which you then play on round 6.
The key cards
MODOK
Unsurprisingly, MODOK is the key card. If I don't draw this by round 5, or it gets hit by Yondu or something else, I tend to retreat.
Morbius
Morbius is one of the most important early cards. It generates 2 points for each discarded card. This effect is Ongoing, so it's great on Onslaught's Citadel, but vulnerable to Rogue and Enchantress.
Mystique
I play Mystique after Morbius when I can, because it duplicates Morbius's effect, meaning my power gain in round 5 is doubled. I will happily skip early rounds for the chance to play Mystique after Morbius, and I try to carefully play both Morbius and Mystique in the right order so this card's effect kicks in.
The Collector
The Collector is another important early card. It generates 1 point for each card that enters my hand, which happens when I discard Swarm, Apocalypse, or Helicarrier. It's not as powerful as Morbius, let alone Morbius and Mystique, but it can generate a lot of points.
Note that The Collector's effect is not ongoing. That means Mystique can't copy it, but also Enchantress can't nullify it.
Swarm
Swarm is the key to multiplying power. Each time MODOK discards Swarm, I get two Swarms that cost 0. This can generate 2 points through Morbius, 2 points through Mystique, 1 point through The Collector, and 3 points by itself.
With On Reveal doubling effects, it's not hard to double this. Ending up in round 6 with 6 Swarms is not very hard.
Colleen Wing
Colleen Wing is only there to discard Swarm. Doubling Swarm before I play MODOK means more points across the board.
All other typical Discard deck cards (Blade, Lady Sif, Sword Master, etc.) don't give you control over which cards get discarded.
Colleen Wing is predictable, and I have removed low cost cards from my deck to make sure I can use this card to discard Swarm, because that will increase my final score. Nothing is more annoying than having Swarm and Colleen Wing but you have a bunch of other 1 or 2 cost standing in your way.
When I see someone play Swarm, or Colleen Wing and it discards anyone but Swarm, I know they're not using the same strategy I am.
Apocalypse
When Apocalypse gets discarded, it comes back with 4 more power, so when I play MODOK on round 5 with this in my hand, it gives me a ton of power to play in round 6.
Wong
Wong allows me to play MODOK twice, which means twice the points to Morbius, Mystique, and The Collector, twice the Apocalypse power boost, twice the Swarms, and a great synergy with Helicarrier.
Helicarrier
Helicarrier is a powerful card in its own right, but it's particularly nice if I have it in my hand and I can somehow play MODOK twice, because 3 cards will enter my hand (giving me points through The Collector), only to be discarded again (giving me points through Morbius and Mystique). It has great synergy in this deck.
It can hurt to see some powerful card like a Knull arrive in my hand, only to be destroyed again, but that's how this deck works. But if I can only play MODOK once, it doesn't hurt to get some nice cards.
Black Cat
Black Cat is more a support card. Either this card discards itself, feeding Morbius and Mystique. Or I get to play it, and 7 points isn't bad.
Remaining cards
That leaves two places in my deck that I have switched in and out over time.
Moon Girl
I thought Moon Girl might be cool because it draws cards, meaning I get points through The Collector. But it hasn't been that useful so far. Hand size is something I have to carefully manage with this deck - I want a lot of cards, but not so many I can't draw - so doubling my hand can be tricky.
Rocket Raccoon
Rocket Raccoon is there in case I just need a random card for something and want to generate some early points. I used to have Iceman, for more or less the same reason.
I will probably keep fiddling with these two places. I might try some utility cards. Scarlet Witch can be useful, but anything that costs 2 or less might interfere with Colleen Wing and Swarm.
Cards I tried
Here are some other cards I tried in this deck.
Crystal
I thought Crystal might be great to play on round 4 in order to get MODOK on round 5, but it also means I lose my existing cards. When I have Swarm and Apocalypse without MODOK on round 4, Crystal won't help me.
Dracula
It's apparently a common tactic to play Dracula on round 4, then end up with a sole boosted Apocalypse at the end of round 6, but I could never quite make that work reliably.
Adam Warlock
I thought Adam Warlock would be great to help draw cards faster early on, and I occasionally made it work, but because I have no reliable way of building power early on it's hard to play it so it draws cards.
Hela
I had Hela in this deck early on but meh. It just wasn't that useful, because it only works if you draw it on round 6.
How I play this deck
Playing this deck is pretty simple.
In rounds 2 to 4, I try to play Morbius, Mystique, and The Collector, Colleen Wing, and Wong.
Then I play MODOK on round 5, and ideally Apocalypse and 2 to 6 Swarms on round 6.
The dynamic is that I have very few cards or points in the first 4 rounds. Ideally any card I don't play will generate more points in round 5, when it gets discarded, than if I do play it. This means I can sneak up on opponents, and snapping in round 4 or at the start of round 5 can work well.
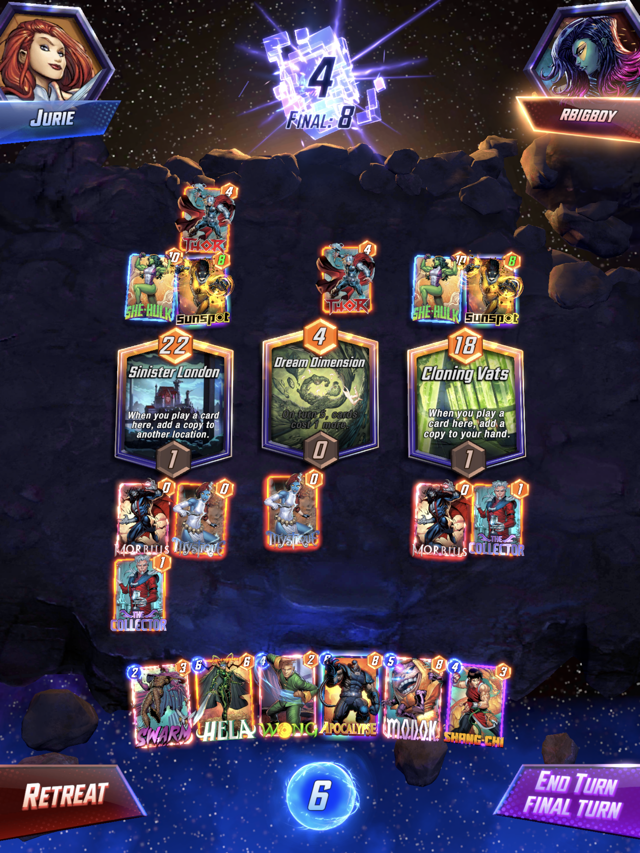
Here is my most dramatic win with this deck yet.
It's the start of round 6. My opponent as 44 points, I have... 2.
Now it's the end of round 6. I have 98 points. That's 96 points from a single card.
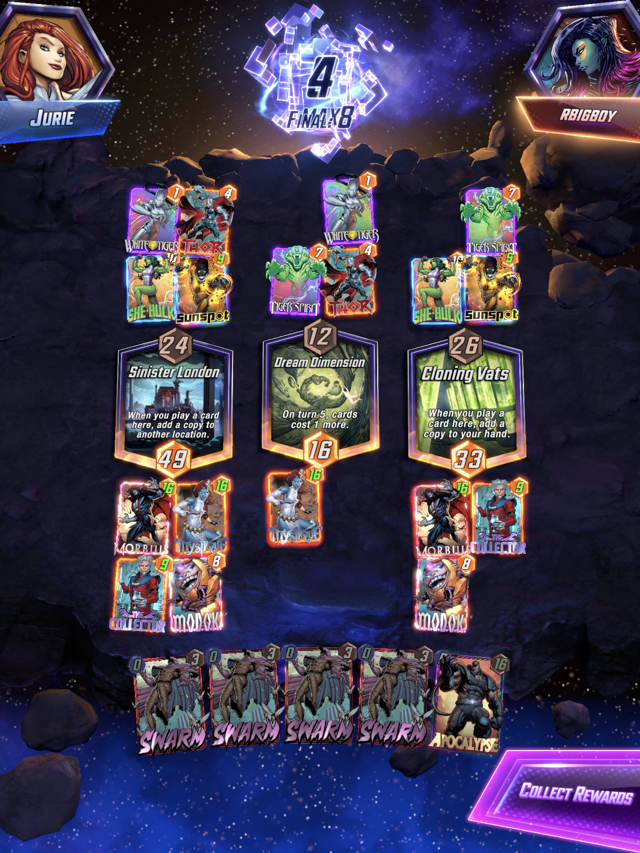
Note here that I didn't even play Apocalypse or my Swarms: that's what I meant by having multiple ways to deliver a ton of power. I can win without playing cards after MODOK, I can win without playing cards that generate points off of MODOK, or I can win with some combination of both. I personally find that more reliable than having a deck that relies on a rarer combo of cards.
Vulnerabilities
This deck is still plenty vulnerable to other cards and locations. Leech and Enchantress can disable Morbius, Swarm, and other key cards. Rogue can steal Morbius's effect. (Today I had a Rogue attack Morbius just before Mystique was revealed. That hurt.)
This deck is not great when I have few locations you can play on, and it has no way of affecting locations I can't play on, like Death's Domain, Luke's Bar, or Sanctum Sanctorum. But it is great with e.g. The Vault because I can play e.g. Morbius there early, and generate power much later.
When Sokovia was the frequent location, I had a bad time, because it discarded MODOK quite frequently.
Other locations that might make me retreat early: Attilan, Bar With No Name, Dream Dimension, District X, Gamma Lab, Mindscape, TVA, Weirdworld.
I can usually work my way around some of the other ones. Elysium, Bar Sinister, Sinister London, Kamar Taj, and Onslaught's Citadel are huge. Nova Roma can be super helpful too.
Conclusion
And that's my MODOK deck. It's not OP, but it has taken me past season rank 40 to season rank 60 for the first time since I started playing Snap. When it hits, it hits big, and that's super satisfying.